

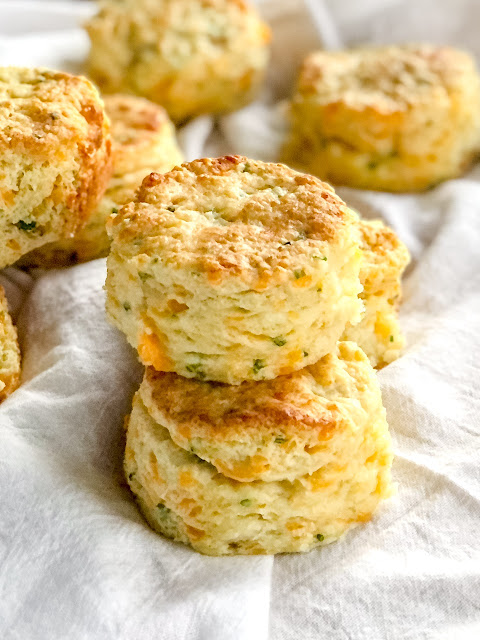
I have been playing around with my Easy Homemade Buttermilk Biscuit recipe and I just have to share this delicious variation. You can add all kinds of things to biscuits to change up the flavor profile, but one of my favorite mix-in combinations are shredded cheese, garlic, and chives. These Garlic Cheddar Chive Buttermilk Biscuits are tender, buttery, flakey, savory and quite delicious.
Biscuits are not as hard to make as many people think they are. If you read through all the tips I’ve included below you will quickly become comfortable with the process and have them on the table in no time at all. The more you make biscuits, the easier they become!
A few tips to help you make the best biscuits:
- Grating frozen butter is the best tip for biscuits. When you grate the butter it means you don’t have to try and get it in to pea sized pieces as it’s already the perfect size. Consequently you don’t have to handle the dough which can make the butter melt before you get the biscuits in to the oven.
- Keep butter in the freezer so you have it ready to grate any time you want to make biscuits. I keep at least two sticks of butter in my freezer at all times and replace them as I take them out.
- After you grate your butter, place the plate with the grated butter back in the freezer until you mix it in to your dry ingredients. Keeping that butter frozen is key!
- I have used both real butter and Imperial margarine sticks and have gotten beautiful results with both. Therefore, if you are a butter purist then use the real butter, but if you want to save a little money, use the Imperial sticks.
- Cheese that is freshly grated rather than pre-grated always works the best, but you can use either for this recipe.
- Keep your buttermilk in the refrigerator until you are going to add it to the dry ingredients. You want to keep it as cold as possible too.
- Don’t twist your biscuit cutter when you cut out the biscuits. If you twist you stop them from being able to rise as high.
- Flour and liquid measurements can vary a little bit based on your climate, so if your dough seems like it won’t come together, sprinkle with a few drops of buttermilk. If it’s wet, sprinkle with a very small amount of flour.
- You can use whole milk if you don’t have buttermilk, but buttermilk definitely gives the biscuits a nice little tang, helps them rise, and keeps them tender.
- You can use a baking sheet lined with parchment or silicone if you don’t have a cake pan. Just start from the middle and make sure they are touching each other. I like the cake pan because the sides help the biscuits to rise a bit more evenly. They always turn out a little more lopsided on the sheet pan!
Ingredients:
- 1/2 cup butter, frozen
- 2-1/2 cups AP flour
- 1 Tbsp baking powder
- 1/2 tsp baking soda
- 1 Tbsp sugar
- 1/2 tsp salt
- 1 tsp garlic
- 1 Tbsp dried chives (can substitute parsley)
- 3/4 cup sharp cheddar cheese
- 1 cup buttermilk
- 2 Tbsp melted butter to brush on the biscuits after baking.
Instructions:
- Preheat oven to 425. Line a 9″ round cake pan with sheet with parchment paper.
- Grate your frozen butter using a box grater then throw it back in the freezer until you need it.
- In a large bowl, whisk together the flour, baking powder, baking soda, sugar, salt, garlic powder and chives.
- Add the frozen butter and shredded cheese to the flour mixture and toss it all together using a fork.
- Make a well in the middle and add the buttermilk – stir using the fork just until it comes together.
- Empty the dough on to a lightly floured surface and gently bring it together with your hands to form it in to a rectangle. Note, it will be crumbly at first but it will come together as you do the rolling and folding. You do not want a very moist dough or you will have stodgy biscuits.
- Sprinkle very lightly with flour and roll it out to about 3/4 of an inch, then fold the dough in thirds on top of each other. Roll again and repeat the process 3-4 more times. This gives you the layers.
- Roll the dough down to a rectangle lightly until it is about an inch thick.
- Use a 3 inch biscuit cutter to cut out the biscuits. Push it straight down and pull straight up, making sure you don’t twist the cutter.
- Once you have cut out as many as you can, gently roll together all the leftover bits and continue to cut out biscuits until the dough is pretty much all gone. (I usually make 8 total and that fits the pan perfectly.)
- Place the biscuits on the pan, one in the middle and the others around it- they will be lightly touching each other.
- Place the whole pan in your freezer for 10 minutes to make sure those ingredients are still cold.
- Brush the tops of the biscuits with milk, buttermilk or cream.
- Bake at 425 for 14-16 minutes
- Remove from oven and brush with melted butter immediately then serve!


Cheddar Garlic & Chive Buttermilk Biscuits
Homemade Garlic Cheddar Chive Buttermilk Biscuits are tender, buttery, flakey and full of flavor. They are the perfect breakfast accompaniment!
EQUIPMENT (Amazon Associate Links)
Ingredients
- 1/2 cup butter, frozen and grated
- 2-1/2 cups AP flour
- 1 Tbsp baking powder
- 1/2 tsp baking soda
- 1 Tbsp sugar
- 1/2 tsp salt
- 1 tsp garlic
- 1 Tbsp dried chives (can substitute parsley)
- 3/4 cup sharp cheddar cheese
- 1 cup buttermilk
- 2 Tbsp melted butter to brush on the biscuits after baking.
Instructions
- Preheat oven to 425. Line a 9″ round cake pan with sheet with parchment paper.
- Grate your frozen butter using a box grater then throw it back in the freezer until you need it.
- In a large bowl, whisk together the flour, baking powder, baking soda, sugar, salt, garlic powder and chives.
- Add the frozen butter and shredded cheese to the flour mixture and toss it all together using a fork.
- Make a well in the middle and add the buttermilk – stir using the fork just until it comes together.
- Empty the dough on to a lightly floured surface and gently bring it together with your hands to form it in to a rectangle. Note, it will be crumbly at first but it will come together as you do the rolling and folding. You do not want a very moist dough or you will have stodgy biscuits.
- Sprinkle very lightly with flour and roll it out to about 3/4 of an inch, then fold the dough in thirds on top of each other. Roll again and repeat the process 3-4 more times. This gives you the layers.
- Roll the dough down to a rectangle lightly until it is about an inch thick.
- Use a 3 inch biscuit cutter to cut out the biscuits. Push it straight down and pull straight up, making sure you don’t twist the cutter.
- Once you have cut out as many as you can, gently roll together all the leftover bits and continue to cut out biscuits until the dough is pretty much all gone. (I usually make 8 total and that fits the pan perfectly.)
- Place the biscuits on the pan, one in the middle and the others around it- they will be lightly touching each other.
- Place the whole pan in your freezer for 10 minutes to make sure those ingredients are still cold.
- Brush the tops of the biscuits with milk, buttermilk or cream.
- Bake at 425 for 14-16 minutes
- Remove from oven and brush with melted butter immediately then serve!
Notes
A few tips to help you make the best biscuits:
- Grating frozen butter is the best tip for biscuits. When you grate the butter it means you don’t have to try and get it in to pea sized pieces as it’s already the perfect size. Consequently you don’t have to handle the dough which can make the butter melt before you get the biscuits in to the oven.
- Keep butter in the freezer so you have it ready to grate any time you want to make biscuits. I keep at least two sticks of butter in my freezer at all times and replace them as I take them out.
- After you grate your butter, place the plate with the grated butter back in the freezer until you mix it in to your dry ingredients. Keeping that butter frozen is key!
- I have used both real butter and Imperial margarine sticks and have gotten beautiful results with both. Therefore, if you are a butter purist then use the real butter, but if you want to save a little money, use the Imperial sticks.
- Cheese that is freshly grated rather than pre-grated always works the best, but you can use either for this recipe.
- Keep your buttermilk in the refrigerator until you are going to add it to the dry ingredients. You want to keep it as cold as possible too.
- Don’t twist your biscuit cutter when you cut out the biscuits. If you twist you stop them from being able to rise as high.
- Flour and liquid measurements can vary a little bit based on your climate, so if your dough seems like it won’t come together, sprinkle with a few drops of buttermilk. If it’s wet, sprinkle with a very small amount of flour.
- You can use whole milk if you don’t have buttermilk, but buttermilk definitely gives the biscuits a nice little tang, helps them rise, and keeps them tender.
- You can use a baking sheet lined with parchment or silicone if you don’t have a cake pan. Just start from the middle and make sure they are touching each other. I like the cake pan because the sides help the biscuits to rise a bit more evenly. They always turn out a little more lopsided on the sheet pan!
0 Comments